Blog
Making a rocking horse: How I set up the workshop and chose which tools to use
15 October 2021
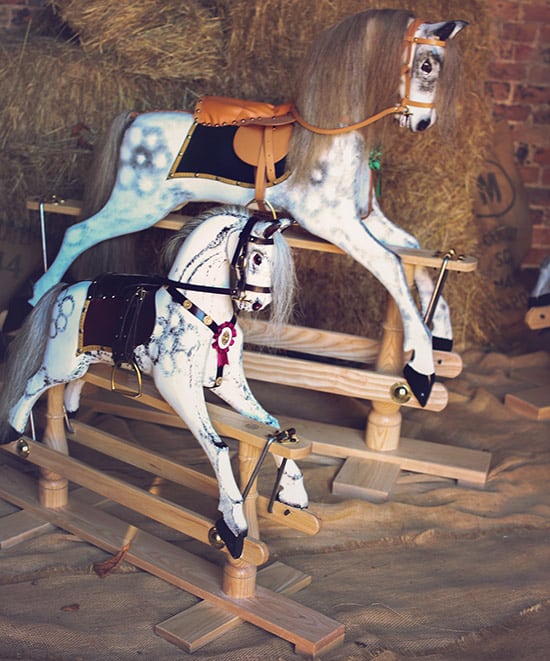
For a while I could make my rocking horses in the garage, but as the family grew, we decided to turn it into a bedroom. This slowed my production down significantly and I only made a few horses between 2002 and 2020. One of them was “Henrietta” (see below).

Henrietta was named and is owned by my cousin and she is doing well in her 'new' home (she is only 18 so she has a long way to go!) After Henrietta, I only had a 6’ x 4’ shed to make rocking horses, which is far too small, especially for a large sized horse. So I started to wonder where I could find a workshop. Given that I was still working full time I did not think that I could afford to rent much of a workshop, so last year I decided to rent out a small area of “The Old Dairy” at a friend’s farm only 10 minutes’ walk away from where I live. It was certainly not much to look at, being full of old canoeing things and only 4.5m long by 3m wide by 2.5m high.
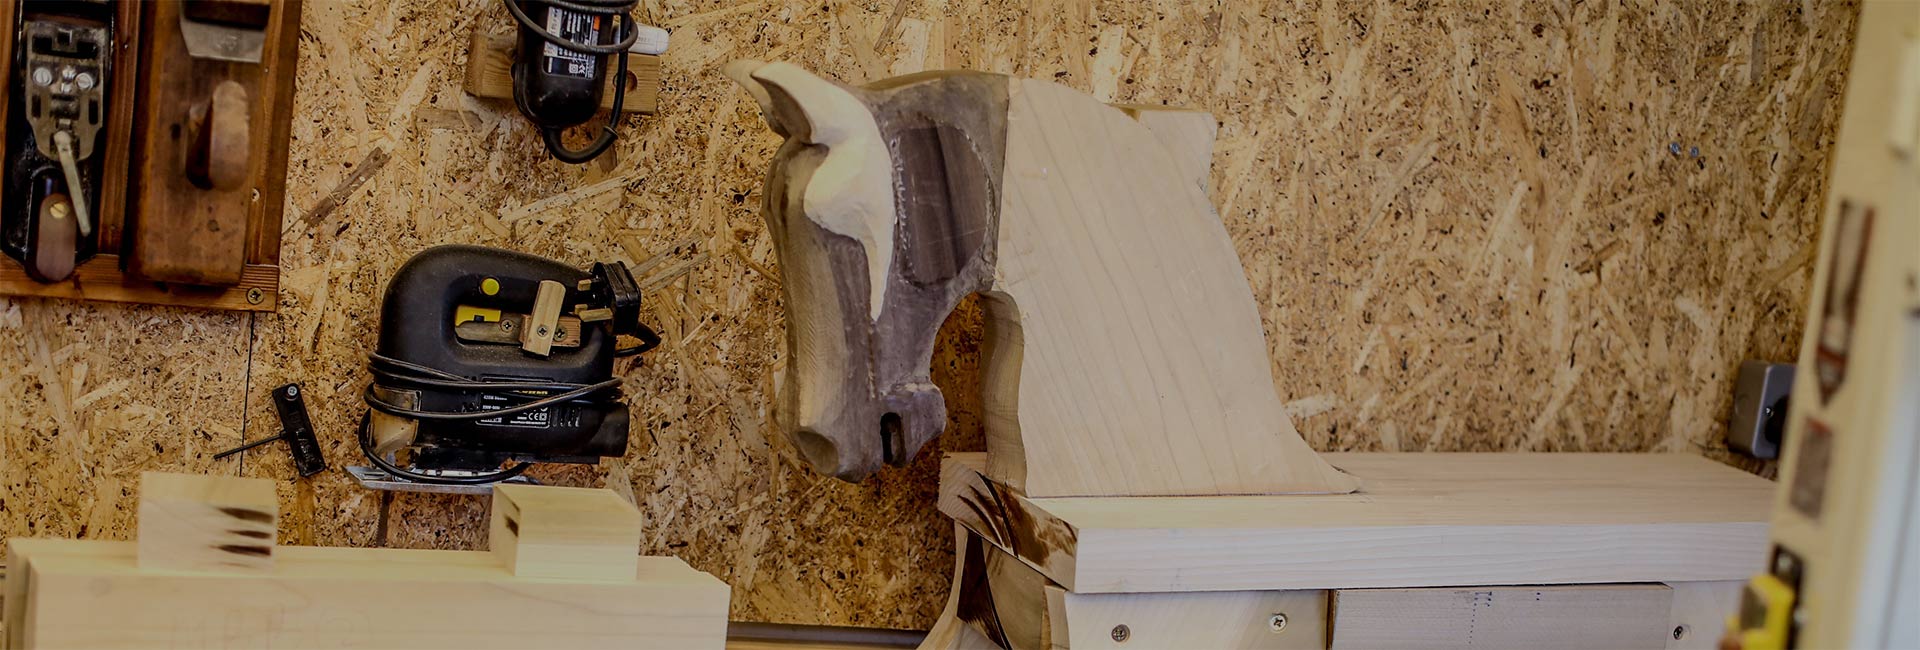
I started working on it in March of 2020 and it took three months to get into a usable state. The roof needed fixing, the doors replacing, the window fixing, a floor laying, electricity being supplied, lighting fitted, holes in walls closing, and then benches, a tool wall, mitre station and bandsaw installation together with associated dust extraction. My bench also needed adapting because is it was quite low, being originally from a middle school, so not the best height for me to plane on - but quite a good height for carving a rocking horse. It was not very heavy though, and the surface needed re-flattening, so I stiffened the top with a lattice-like structure of wooden boards. I then flattened it, first with my wooden jack plane, then with my Stanley No. 5, then finally with my Stanley no.4 just so it looked nice. I then wiped it with linseed oil and it looked like new. (It’s back to looking well used now).
As far as tools go, I have one or two of my grandfather's tools: a drawknife and axe (the axe handle still needs to be finished). I have been collecting old tools from eBay and some other outlets for several years so I have enough planes, mostly Stanley’s that I have re-furbished and tuned up. My favourite is the Stanley No.5 as it is a bit heavier than the No.4 so takes no prisoners when I want to flatten a board. The one hand held power-tool I use a lot is the Makita cordless drill. It’s great and seems to hold its power for days. I plan to add an impact driver to this as it will speed things up with not needing to change fittings as much. The extra torque of the impact driver should get the large screws which hold the legs on driven in more quickly.
I sharpening my gouges, chisels and plane irons using the diamond stone method. I have three: coarse fine and extra fine (though I rarely use the extra fine, it does not seem to give much advantage). I then generally strop my blades on a leather strop impregnated with the green grinding wax. In future I want to experiment with an MDF wheel on one of my drills with grinding paste. I think it will give quicker results, though every now and then I will need to re form the bevel and therefore go through the grits more thoroughly.
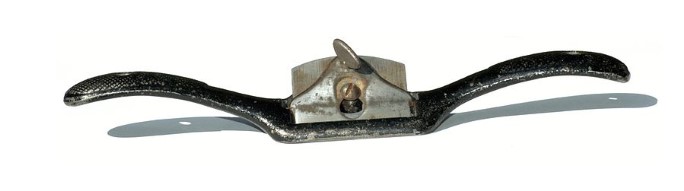
My favourite tool is the spokeshave, specifically one which I bought when I was about 14. It has a new blade, but the handle is original (with none of the original black paint left). I use it for many things, including carving curves on the rocking horse legs, rounding off the corners of the curves on the hoof rails and removing deep gouge marks on the body of the horses. When sharp the finish needs no further sanding at all. The picture below is like my favourite spokeshave, without the screw adjusters. I just set the depth of cut by eye and I usually have the blade at a slight angle so I can adjust the depth of cut as I am working.
My next favourite tool is the cabinet scraper, which sounds more than it is. It’s just a rectangle of sprung steel on which I put burrs on all the edges (by grinding flat on the diamond stones then “Bending over” the corners with a burnishing tool). Why do I like it so much? Well, ash is quite a hard wood and sometimes the grain can go all over the place, making it well-nigh possible to plane flat, with even my Stanley No. 5. The burr is so sharp one can take wafer thin shavings off end grain and wild grain. So, on the stands, if there is a bit of really bad grain, I will do my best with the Stanley, then perhaps use an 80-grit abrasive paper and work down to 120 grit. Then, I will attack the remaining tear out or other defect with the cabinet scraper, which has never failed me yet. I also give all surfaces on the stand a light going over with the cabinet scraper as it really brings out the beauty of the natural grain patterns in the wood.
What is the most useful tool for making rocking horses? Well, if you plan on making more than one, I would say the bandsaw. Even my grandfather Richard had a bandsaw. The rocking horse has few straight lines on it, but the legs, head and neck all have to be cut out of flat - usually rectangular - boards. My bandsaw is a 16” Jet, which means that the two wheels are 16” in diameter. This allows me to easily cut out all the parts of the rocking horse with the same tool. Because the table can tilt, it also lets me cut the leg notches on the body blocks at the right angle (8 degrees for the front and 5 degrees for the rear), repeatedly and with a good degree of accuracy.
One thing I have learnt over the years is that you generally get what you pay for with a tool and good tools do a better job than cheap tools. So, I try to buy the best I can afford at the time. Or occasionally if I am experimenting, I will buy a cheap version to test the principle of the thing and, if it works, replace the tool with a good version later.